Running Ansys Mechanical APDL using an LSF Job Scheduler (command line; without GUI)
More information about CMC’s Load Sharing Facility (LSF) job scheduler is provided here. CMC’s CAD Compute Cluster consists of four login nodes named uwlogin*; eight simulation nodes named uwmhpc*; and two management nodes named uwlsfm*. You can list these nodes using the command lshosts.
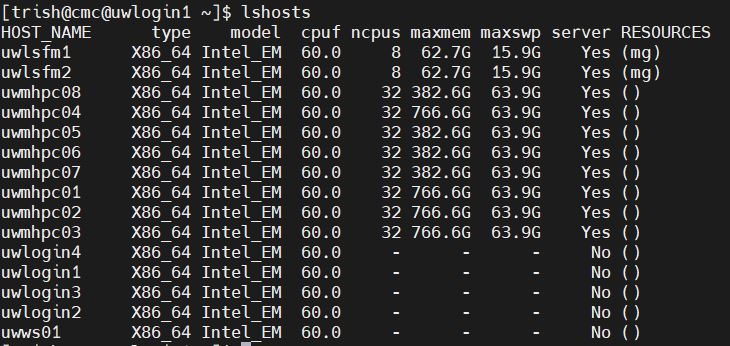
Figure 1: The Nodes in the CAD Compute Cluster
When you run a simulation on the Cluster, you will submit your job request to an LSF queue. The job scheduler will attempt to assign to your job the hardware (CPU cores and RAM) you want to use for your simulation run. Use the bqueues command to display queue names.

Figure 2: The Queues in the CAD Compute Cluster
Summary: It is possible to run Mechanical APDL simulations by writing a shell script containing all the commands that are to be given to the software, and then sending the script to the job scheduler.
Here are the steps that have been tested in the Cluster to demonstrate this approach.
Test file: Ansys ACL ligament example (td-32) included with Ansys software.
- Reserve an instance of the virtual CAD Compute Cluster image, and log into the Cluster from within this image.
- Use the setsshkey utility under /home/scripts to generate an SSH passcode.
You only do this once, when you first set up your home directory on the Cluster. For simplicity, do not enter a password and leave the result in the default location. This is usually your home directory on a Cluster login node.

Figure 3: Setting up a Passcode on Each Node in the Cluster
- Enter the command module load ansys in your terminal window.
- Enter the command module list to see if the software has been linked to the LSF job scheduler.
- Use mpitest to verify Message-Passing Interface (MPI) software function.
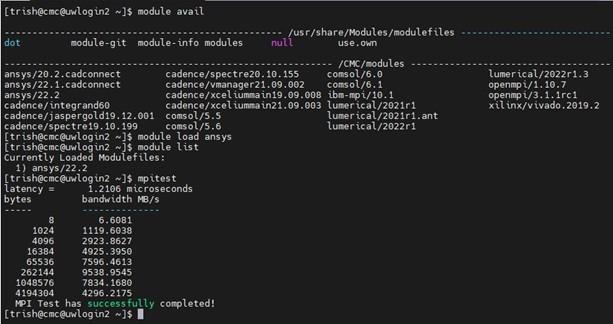
Figure 4: Summary of Set-up Commands to run Ansys 2022
- Create a shell file to enter LSF batch submission (bsub) and the Ansys batch commands.
See Appendix A for an example (my_ansys_shell.sh). - Upload your project file(s) to your working directory.
We provide instructions for using MobaXterm to perform a secure file transfer (sftp) upload in or CAD Compute Cluster documents. - Upload your shell file to same directory.
Ensure that the text in your shell file does not contain extraneous Windows editor characters (e.g., a carriage return). We recommend the use of Linux-based text editor vim to create scripts and text files on our Cluster. This editor is built into its Linux operating system. - Use bsub < my_ansys_shell.sh command at a prompt to run a simulation.
If you choose Shared Computing (SMP), your job will be confined to one node only (e.g., uwmhpc03 or uwmhpc05). The maximum number of cores on any Cluster node is 32.
If you choose Distributed Computing (DMP), this can run across more than one node using Infiniband software running in the Cluster’s backplane. Cluster users are however restricted to a maximum of 32 cores to prevent abuse of privileges.
As of Ansys 2022, there is a combined SMP+DMP form of simulation called hybrid parallel processing. An additional option -nt in the command line sets this form. See the Parallel Processing Guide for Ansys 2022 to learn about these three implementations.
Use commands such as bjobs and bhosts during simulation runs to monitor simulation progress. For example:
~$ bjobs -l
… or
~$ bhosts
Appendix A
Any text after a single # is visible to the LSF Job Scheduler and will be read as a possible command by LSF.
Any command after ## is treated as a comment by both LSF and Ansys.
Here is an example script.
————————————————————————————-
#!/usr/bin/env sh
##This sets the Linux shell to BASH
##embedded options to bsub – start with #BSUB
## — Name of the job —
#BSUB -J ansys_mapdl_example
## — specify queue —
#BSUB -q adept
## — specify the number of processors to a maximum of 32—
#BSUB -n 32
## — Specify the output and error files. %J is the job ID —
## — -o and -e mean append, –oo and-eo mean overwrite —
#BSUB –oo example_acl_%J.out
#BSUB –eo example_acl_%J.err
## — example of ansys command line call —
## –smp Shared Memory Ansys
ansys222 -np 32 –ppf anshpc –smp -i acl_tension.dat -o output_results.out
## or for a -dis Distributed Memory simulation:
##
##ansys222 -np 32 -dis -ppf anshpc -i acl_tension.dat -o output_results.out
##
##or for a hybrid implementation using maximum of 32 cores
##ansys221 -np 2 -nt 16 -ppf anshpc -i acl_tension.dat -o output_results.out
————————————————————————————-