Accepting the Usage Terms and Conditions
The first time you create an instance, you need to accept the CMC Environment Usage Agreement
. After you have reviewed the Usage Agreement and you have accepted it:
- Check the box beside I have read and accept these usage terms and conditions.
- Click the button Submit, as shown in Figure 1.
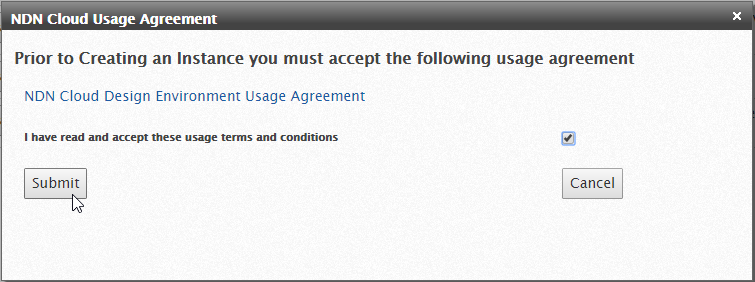
Figure 1: CMC cloud Usage Agreement
Creating a New Instance
- Click the button Create Instance next to the environment that you want to use, as shown in Figure 2.

Figure 2: Create Instance
The dialog box New Instance is displayed, as shown in Figure 3.
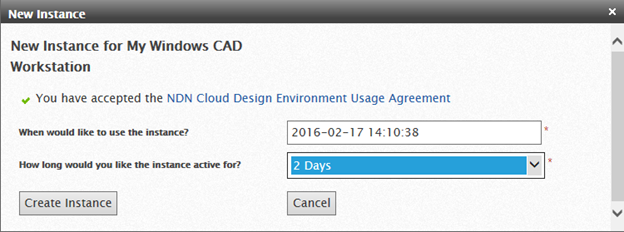
Figure 3: New Instance
- In the dialog box New Instance, enter the start time (default is immediately) and how long you want the instance to remain active for.
- Click Create Instance
Note:
- If your instance expires, the entire session is reset.
- Make the instance duration long enough to finish your work.
Managing your data
The most important thing to remember is that you must copy your working files to the virtual Instance while you are running the Tools, but we do not have permanent storage there as of yet. Before your virtual instance expires, you must copy your files back to your local workstation. Also do NOT run your files from your own local workstation.
Note: All files inside the Instance are LOST when your Instance expires.
Managing “My Instance”
After clicking Create Instance, you are redirected to the tab Manage My Instance.
Note: If you leave the web application, you can return to your instances list by clicking the tab Manage My Instance, as shown in Figure 4.

Figure 4: Manage My Instance
To retrieve your connection information, click the button Connect.
Note: It may take several minutes to display connection information similar to that shown in Figure 5.
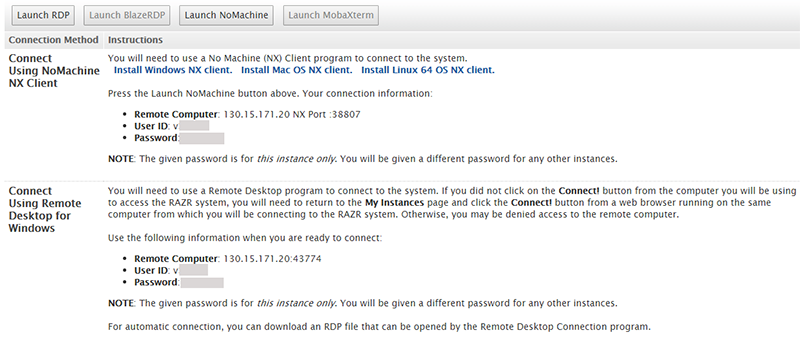
Figure 5: Connection Information
Connect to Your Instance
The webpage Connect to your instance lists all of the ways in which you can connect to your instance. For example, in Figure 5 you can connect to this environment using:
- NoMachine NX Client: A remote desktop connection client
- Remote Desktop for Windows: A remote desktop connection client
Note: NoMachine client has better Display Performance. NoMachine instructions are outlined in this guide. However, RDP will connect to your local workstation drives by default and nothing has to be installed.
Modifying “My Instance”
You can extend or delete your instance.
To extend your instance:
- From https://vcad.cmc.ca/, go to the tab Manage My Instance.
- Next to the instance that you want to extend, click Extend, as shown in Figure 6.

Figure 6: Extend Button
- In the resulting dialog box, select the time you want to extend the instance for and click Extend Instance, as shown in Figure 7.
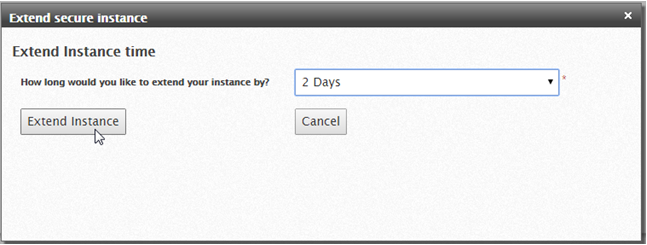
Figure 7: Extend Your Instance
To delete your instance:
- From https://vcad.cmc.ca/, go to the tab Manage My Instance.
- Click the button Delete, as shown in Figure 8.
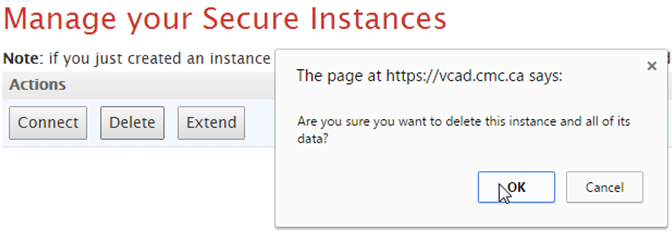
Figure 8: Delete Your Instance
Connect Using the RDP Client
When your secure instance is ready to accept connections, if you want a desktop environment, you can connect with one of our connection methods, as shown in Figure 9.
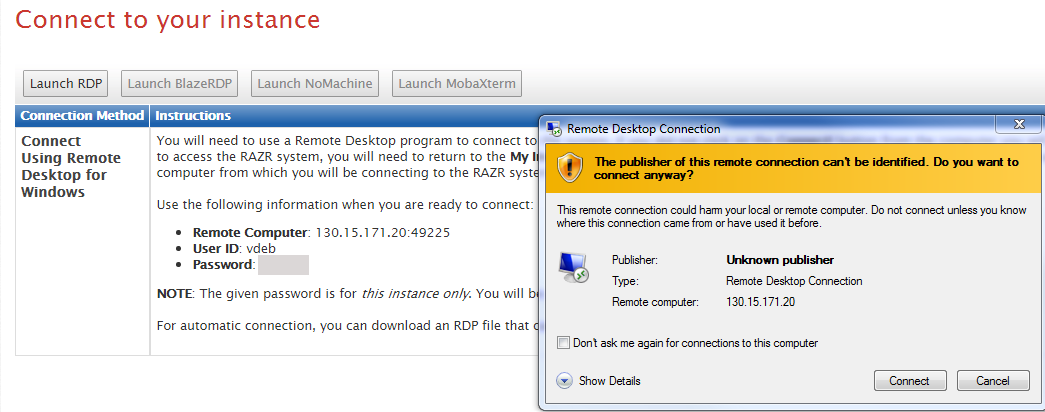
Figure 9: RDP Connection
Select Yes to trust the certificate as shown in Figure 10.
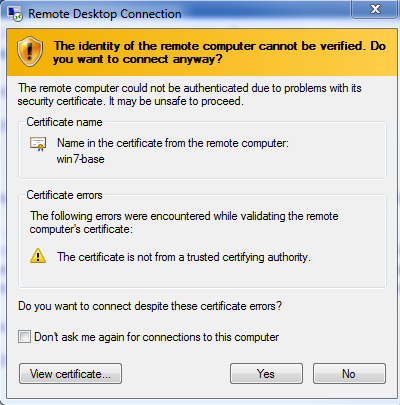
Figure 10. Trust Certificate
Connect Using the NoMachine Client
When your secure instance is ready to accept connections, if you want a desktop environment, you can connect with one of our connection methods.
Installing NoMachine
If you have not installed NoMachine previously, depending on your operating system, you can install it using the link provided in the connection instructions, as shown in Figure 11.
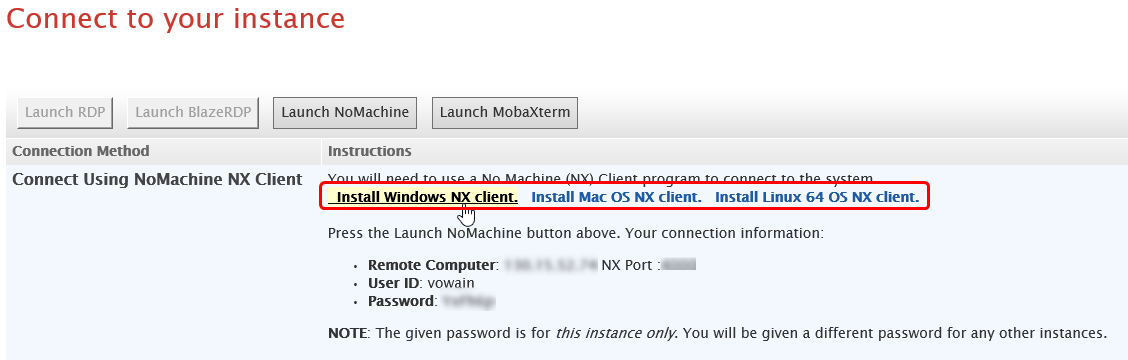
Figure 11: NoMachine Client Download
Supported client operating systems are: Windows, Mac, RedHat, CentOS, and Scientific Linux.
- For Windows, download CADpassV4_NX_Installer.exe using the link in Figure 11.
- Run CADpassV4_NX_Installer.exe.
- Review and agree to the terms and conditions and click Install, as shown in Figure 12.
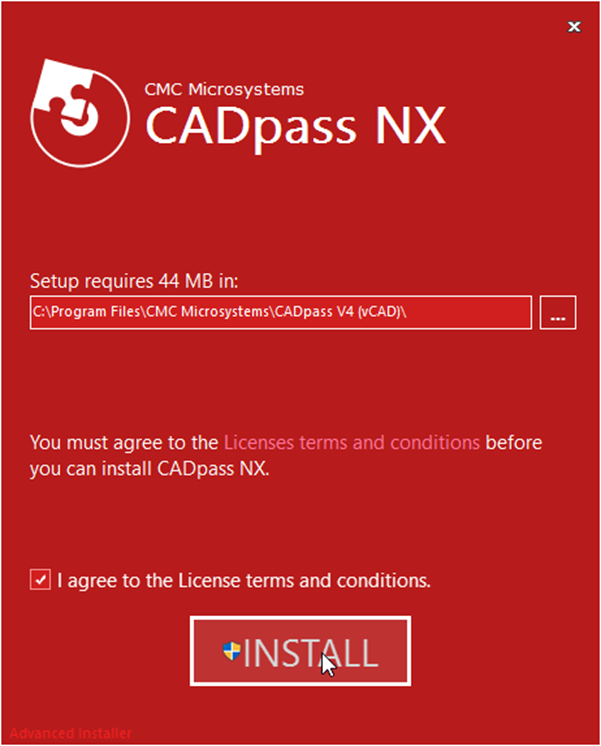
Figure 12: Install
Note: You may need to restart your workstation after the installation has finished.
- To download a NoMachine launch file that is configured to connect to your instance, click Launch NoMachine, as shown in Figure 13.
Note: Do not launch the file from your browser. Save the file to another location and launch the file by double-clicking it.
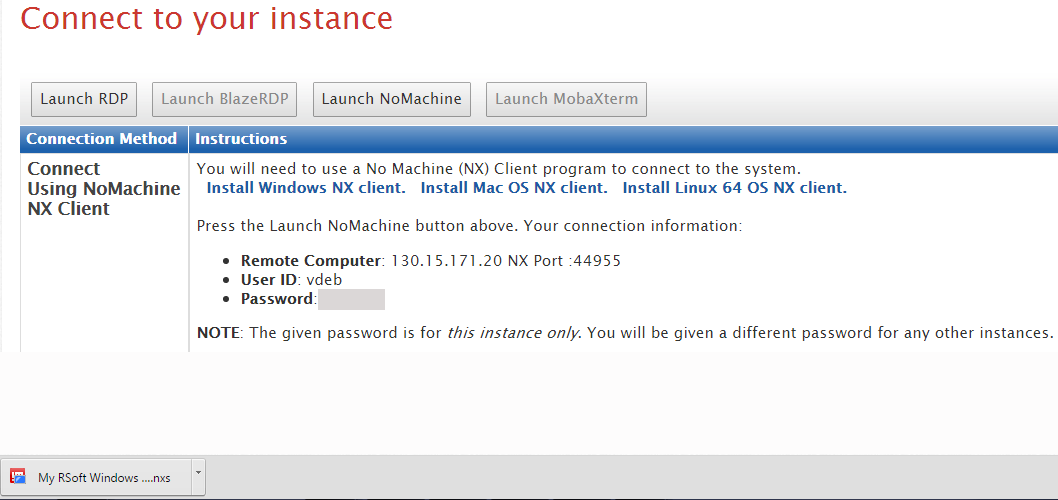
Figure 13: Launch NoMachine
- Browse to the folder where you downloaded the NoMachine Launch file and double-click it, as shown in Figure 14.

Figure 14: NoMachine Launch File
Running NoMachine for the First Time
The first time that you connect to your instance by running the NoMachine Launch file, you need to add the instance to NoMachine’s trusted host list.
- In the dialog box Verify host authenticity, click Yes, as shown in Figure 15.
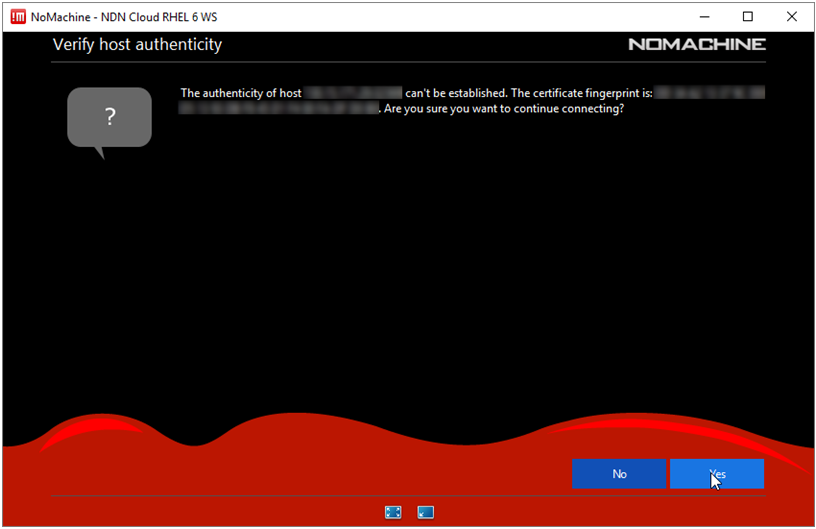
Figure 15: Verify Host Authenticity
Note: CMC recommends that you accept the default configuration in the preferences dialog boxes.
- If you do not want to see the preferences dialog boxes in future connections, click the check boxes.
Working with “My Instance”
This section describes some of the important features of your instance and how you can use them.
Logging In to “My Instance”
- In your instance OS login screen, enter the user ID and Password retrieved from the Connect to your Instance webpage.
Note: The password is unique to this instance and will be different for any future instances that you create.
- Click Log In.
Description of “My Instance”
As noted previously, there is no permanent storage for your files.
Uploading and Downloading Files
If you use RDP, your own local workstation drives should be connected by Default, as shown in Figure 16.
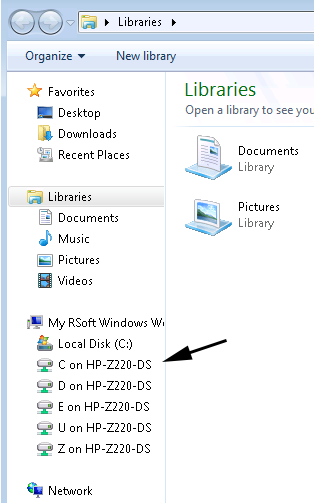
Figure 16. Local Drives are Connected by Default
If you use NoMachine, hold your mouse in the top right hand corner, see Figure 17.
Figure 17. NoMachine Top Right Hand Corner
Then Select Devices as shown in Figure 18.
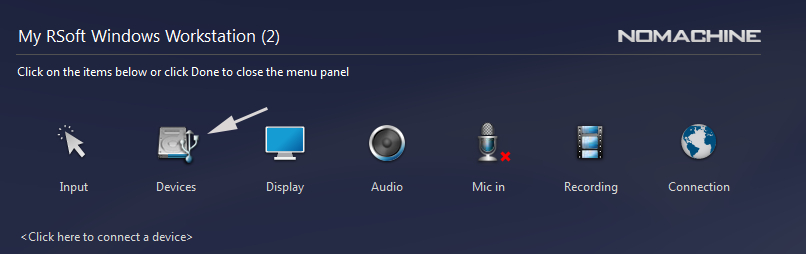
Figure 18. NoMachine Settings
Click on Connect a disk as shown in Figure 19.
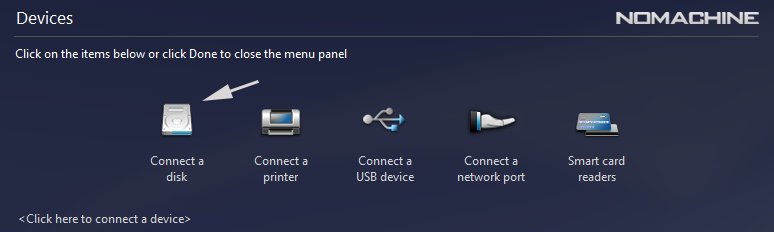
Figure 19. Connect a Disk
Select one of your Local Disks as shown in Figure 20.
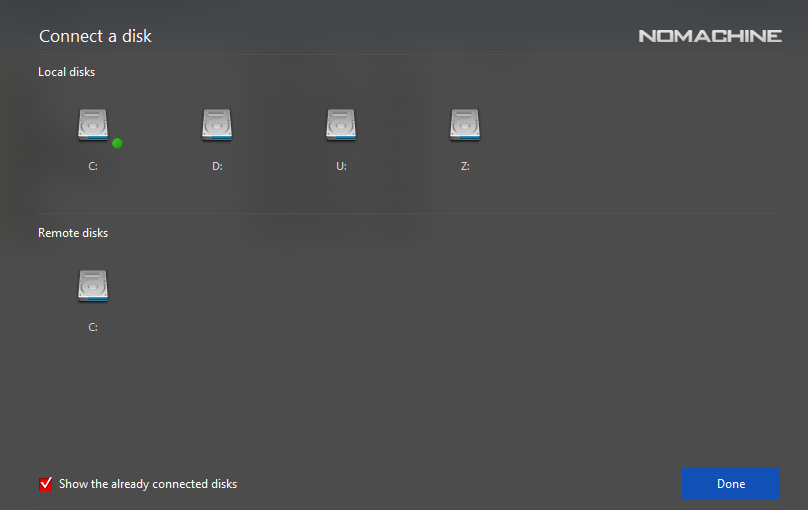
Figure 20. Select Your Local Disk
Then click Done, and then Done Again. This will take your back to your desktop and the Local Drive will be available as shown in Figure 21.
Figure 21. Local Drive on Desktop
Viewing Accessible CAD Tools
You can view the CAD tools that you are able to access based on your research team’s CAD selection from the tab My Access. Figure 22 shows the CAD tools that are available to the team, how many licenses are available on the server, and if anybody on the team is currently using the pass.
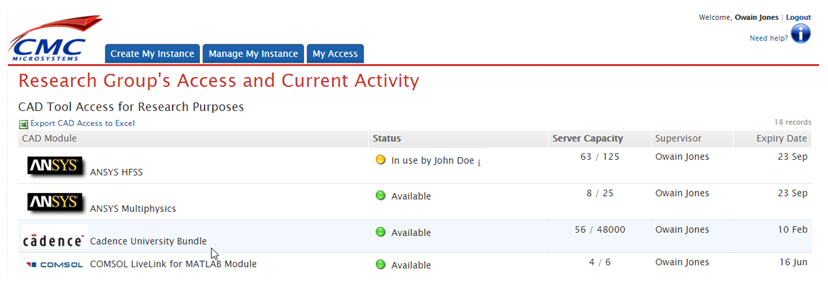
Figure 22: My Tab