CMC cloud VCAD instances are virtual on-demand secure design environments based on the Linux operating system. These environments include CAD tool suites and can host Process Design Kits (PDKs). This document is a guide for you to use the CMC cloud in which you can perform your research activities.
Log in using your CMC registered email address and password.
Accepting the Usage Terms and Conditions
The first time you create an instance, you must accept the CMC Environment Usage Agreement. After you have reviewed this agreement, accept it:
Check the box beside I have read and accept these usage terms and conditions, and click the button Submit.
Getting Started With “My Instance”
In the CMC cloud design environments, “Instance” relates to the lifetime of the virtual machine that is being requested by you in the environment. You can connect to a single Instance multiple times and it is still considered a single Instance.
Creating a New Instance
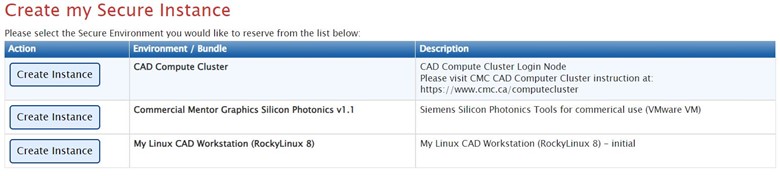
Click the button Create Instance next to the environment that you want to use, as shown in Figure 1.
Figure 1: Create Instance
The dialog box New Instance is displayed, as shown in Figure 2.
Figure 2: New Instance
In the dialogue box New Instance, enter the start time (default is immediately) and how long you want the instance to remain active.
Click Create Instance.
Notes:
If your instance expires, the entire session is reset.
Make the instance duration long enough to finish your work.
Managing “My Instance”
After clicking Create Instance, you are redirected to the tab Manage My Instance.
Note: If you leave the web application, you can return to your instances list by clicking the tab Manage My Instance, as shown in Figure 3.
Figure 3: Manage My Instance
To retrieve your connection information, click Connect. Note: It may take several minutes to display connection information like that shown in Figure 4.
Figure 4: Connection Information
Connect to Your Instance
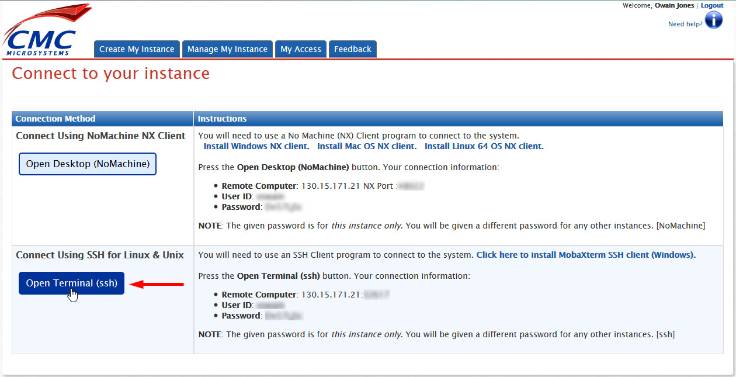
The webpage Connect to your instance lists the ways in which you can connect to your instance. For example, as seen in Figure 4, you can connect to this environment using:
NoMachine NX Client: A remote desktop connection client
SSH for Linux & Unix: Any SSH client
Note: If you are using your own SSH client, use the following command to connect to your instance:
$ ssh <User ID>@<ipAddress> -p <portNumber>
where <ipAddress> and <portNumber> are displayed in the Remote Computer connection information.
When your secure instance is ready to accept connections, and if you want a desktop environment, CMC recommends using the NoMachine Client to connect.
Installing NoMachine
If you have not installed NoMachine previously, depending on your operating system, you can install it using the link provided in the connection instructions, as shown in Figure 8.
For Windows, download nomachine*.exe using the link as shown in Figure 8.
Run nomachine*.exe.
Review and agree to the terms and conditions and click Install, as shown in Figure 9.
Figure 9: Installing NoMachine Client
Note: You may need to restart your workstation after the installation has finished.
To download a NoMachine launch file that is configured to connect to your instance, click Open Desktop (NoMachine), as shown in Figure 10.
Note: Do not launch the file from your browser. Save the file to another location and launch the file by double-clicking it.
Figure 10: Launch NoMachine
Browse to the folder where you downloaded the NoMachine Launch file and double-click it, as shown in Figure 11.
Figure 11: NoMachine Launch File
Running NoMachine for the First Time
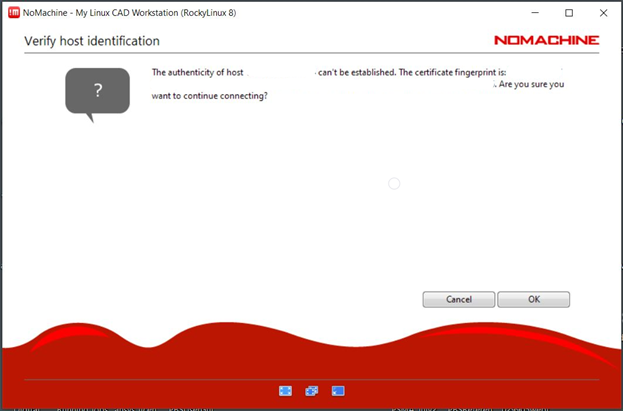
The first time that you connect to your instance by running the NoMachine Launch file, you need to add your Instance to NoMachine’s trusted host list.
In the dialogue box Verify host authenticity, click Yes, as shown in Figure 12.
Figure 12: Verify Host Authenticity
Note: CMC recommends that you accept the default configuration in the preferences dialogueg boxes.
If you do not want to see the preferences dialogue boxes in future connections, click the checkboxes.
Note: We do not recommend mounting local folders in NoMachine.
Working with “My Instance”
This section describes some of the important features of your instance and how you can use them.
Logging In to “My Instance”
In your instance OS login screen, enter the user ID and Password retrieved from the Connect to your Instance webpage, as shown in Figure 13.
Note: The password is unique to this instance and will be different for any future instances that you create.
Click Log In.
Figure 13: “My Instance” Login
Description of “My Instance” Folders in CMC cloud
The folder $HOME has a fixed size. It is small and without backup. Do not save data to it.
The folder $HOME/mydata is your space for saving your data and project, which is backed up. However, it is strongly recommended that you save copies of your files to your local system.
The folder /scratch/$USER has large space. It is used to store temporary simulation files. The folder has no backup and will be cleaned up without notice.
The Folder $HOME/mydata
The folder $HOME/mydata is available to all users of CMC cloud. It is your persistent storage. This storage is described in more detail in the CMC cloud design environment Usage Agreement.
To find out how much space you have used, open a terminal from the instance, and enter the command:
$ cd; du -sh mydata
Note: All files and settings that are not saved to your mydata folder are lost when your instance expires.
The Folder /scratch/$USER
Some CAD tools use large disk space for simulation temporary files, which may cause a system/instance crash during simulation. To resolve it, CMC has added a file system. You must point your CAD simulation temporary directory to a folder named /scratch/$USER.
To initialize the folder /scratch, follow these steps:
Log in to your instance.
Open a terminal.
Run the script $ /scratch/scripts/scratch.sh create
Note: /scratch is for temporary use only. Old files in the folder will be removed without notice.
Once /scratch has been initialized, you can point your simulation temporary directory to it. For example, you can start COMSOL by entering:
$ comsol -tmpdir /scratch/$USER
My Linux CAD Workstation
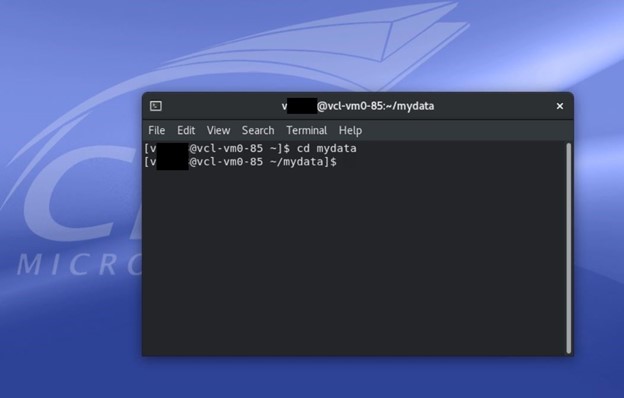
As noted previously, your mydata directory is your persistent storage on CMC cloud. In a terminal, you can access mydata from your home directory, as shown in Figure 14, using:
$ cd mydata
Figure 14: The mydata Folder
My Linux CAD Workstation (RockyLinux 8)
Our RockyLinux 8 instance comes with GNOME desktop 3, as shown in Figure 15. To access other applications, you must click the Activities icon in the upper left corner (see Figure 15). To run a CAD tool, follow the instructions given in the section Running CAD tools in CMC VCAD Cloud below. A list of scripts and start commands is provided on our webpage entitled How to Launch CAD Tools Supported by CMC.
Figure 15: Running Applications in the Gnome Desktop
Uploading and Downloading Files
Notes:
Before you begin, we recommend that you save your data or other file(s) in the directory mydata (see Figure 15), which is accessible from CMC cloud systems.
We strongly recommend that you use an SSH client to perform file transfer and do not mount your local folders using NoMachine for this purpose.
Follow these steps:
Connect to CMC cloud instance using SSH, as shown in Figure 16.
Figure 16: Connecting Using SSH
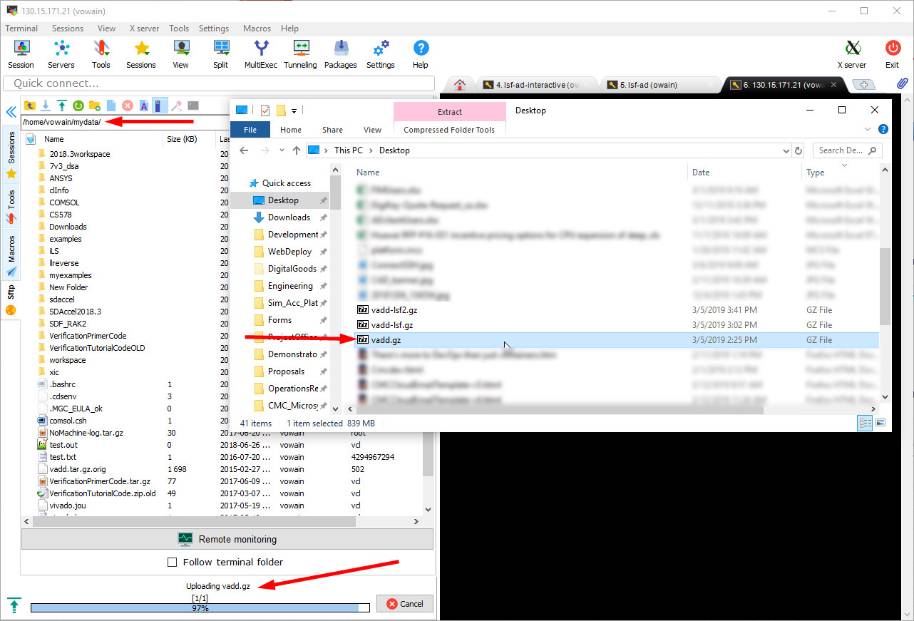
Drag and drop your files between CMC cloud and your local system, as shown in Figure 17.
Figure 17: Dragging Files between CMC Cloud and Local System
Viewing Accessible CAD Tools
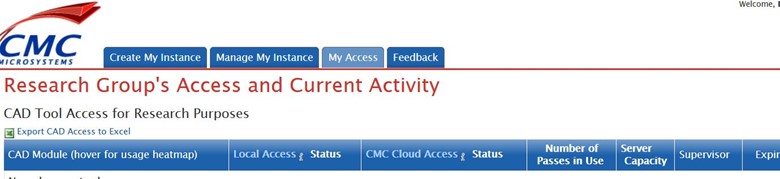
You can view the CAD tools that you are able to access based on your research team’s CAD selection from the tab My Access. Figure 18 shows the CAD tools that are available to the team, how many licenses are available on the server, and if anybody on the team is currently using these licenses.
Figure 18: My Access Tab
Running CAD Tools in CMC VCAD Cloud
Using a Terminal to Start CAD Tool or Design Kit
Open a terminal, and source the related script before you run a CAD tool. For example, to run Cadence Virtuoso, enter the following commands:
Note: For a complete list of license variables and script files, see Appendix A and Appendix B.
Getting Support
If you encounter any issues using this infrastructure, contact CMC support by using our Support Form. To resolve your issue as quickly as possible, CMC encourages you to include as much relevant detail as you can.
As CMC installs new tools on our infrastructure, this webpage is updated with instructions for how to run them. Navigate to the scripts directory in this VCAD environment using:
$ cd /CMC/scripts/
Contact us through our Support page if you need script help when setting up your Cloud environment.
Does your research benefit from products and services provided by CMC Microsystems?
Our office is closed today in observance of Canada Day and will resume operations on the next business day. We’ll respond to your message as soon as possible when we’re back.